Setting Up a New Season (QA Checklist)
This article is a streamlined season setup checklist based on what MatchGrid’s dashboard prompts you to do. If you follow these steps in order, you’ll end up in a state where scheduling can begin immediately.
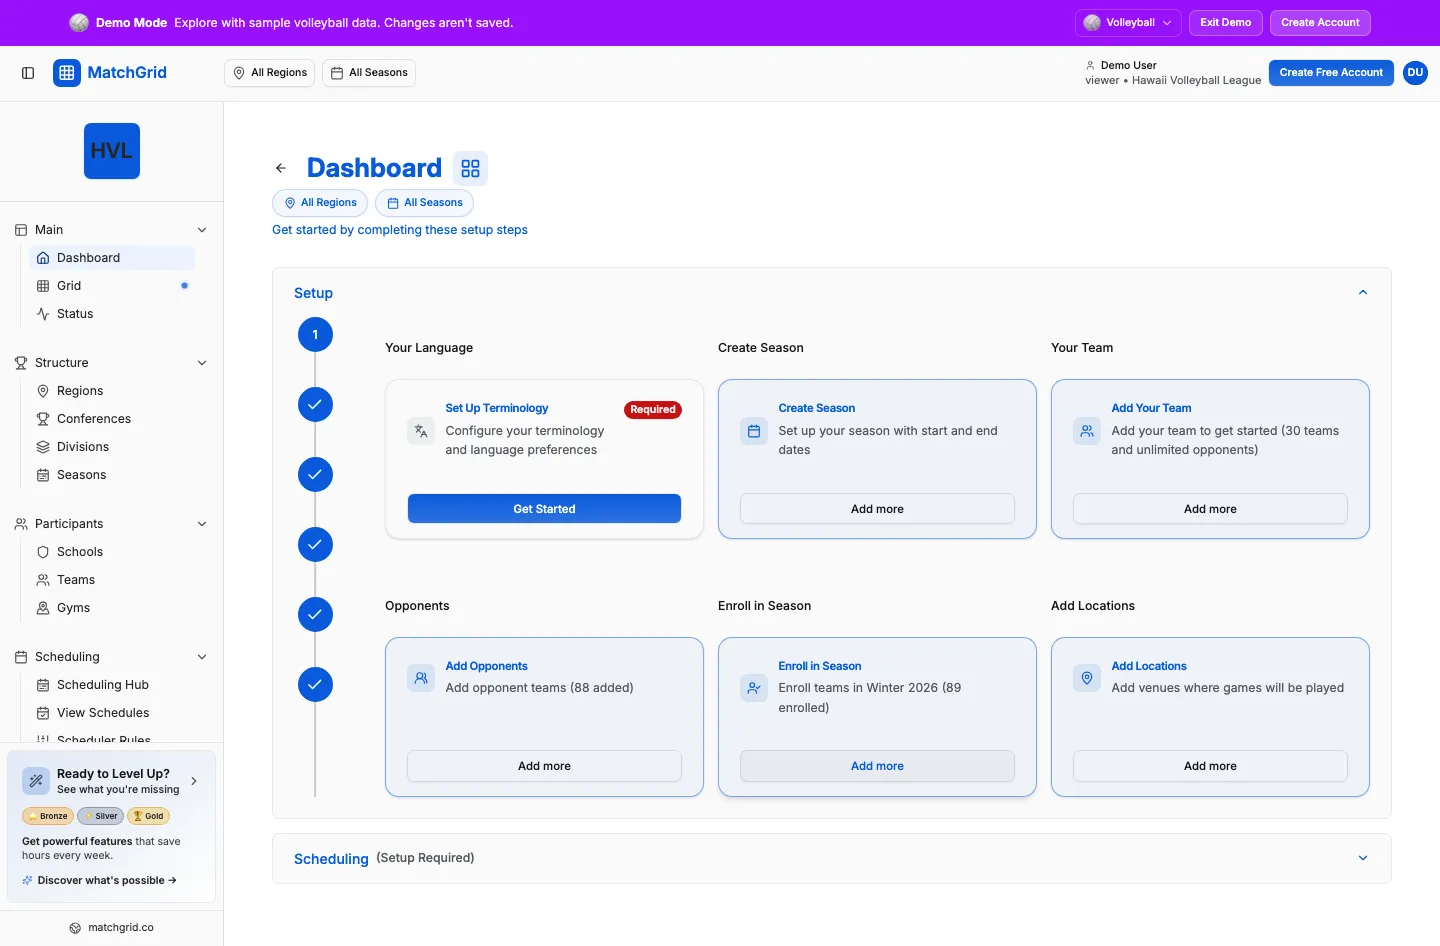
What “ready” means in MatchGrid
On the dashboard you’ll see setup guidance. Two parts of the app matter most:
- The Setup tiles (example titles you’ll see):
- Set Up Terminology
- Create Season
- Add Your Team
- Add Opponents
- Enroll in Season
- Add Locations
- The minimum viable setup checks (used to determine when you can start scheduling):
- Season with dates
- At least 1 location
- At least 1 court
- At least 2 teams (enrolled in the season)
If you’re missing something, MatchGrid will show an action like Add Season, Add Location, Add Court, or Enroll Team that takes you directly to the right page.
Step 0 — Pick the right context (Region + Season)
Most pages in MatchGrid are scoped by the context pickers in the top bar (for example All Regions / All Seasons).
- If you’re setting up a specific season, select it before you start enrolling teams.
- If you don’t select a season, some steps will tell you to select one first (for example, the teams enrollment checklist).
Step 1 — Create (or select) the season
Where to go
- Navigate to Seasons (
/seasons) - Click Create Season
What to fill out (the wizard uses these exact fields)
In the season wizard you’ll see required fields:
- Start Date *
- End Date *
You’ll finish with Create Season (or Update Season if you’re editing).
You’ll also see navigation buttons in the wizard:
- Next
- Back
[!TIP] If you see an overlap warning, the wizard may tell you to click Create Season again to proceed anyway.
Carry-forward options (if you already have seasons)
If you already have seasons in your organization, the wizard may include a step that lets you carry forward:
- divisions
- teams
- blackouts
- scheduler rules
Keep these on if your new season is similar to the previous one. Turn them off if you’re intentionally starting fresh.
Step 2 — Add teams (your team + opponents)
Add your first team
From the dashboard, click Add Your Team (or go to Teams).
On the Teams page, click Add Team (top-right). It opens a dropdown with:
- Add Single Teams
- Bulk Create (Multiple)
In the team dialog:
- Use the Details tab
- Fill in Team Name * and Club *
- Click Create Team
Add opponents
The dashboard will show a tile called Add Opponents after you add your first team.
In the app, “opponents” are just additional teams in your registry. Add as many as you need to build your season schedule.
[!TIP] In the team dialog you’ll also see Travel Limits fields (Weekday Max Miles / Weekend Max Miles). You can leave them inherited at first and refine later.
Step 3 — Enroll teams into the season (critical)
Having teams in your registry is not enough — teams must be enrolled in the season.
From the dashboard, click Enroll in Season. This takes you to Teams in Registry mode:
/teams?tab=available- The UI label for this tab is Registry
You’re done with this step when you have at least 2 teams enrolled.
[!INFO] The minimum setup checklist will show “At least 2 teams” as complete only when there are ( \ge 2 ) enrolled teams.
Where the enroll action lives
On the Teams page header, you may see Enroll Teams (this appears when you have permission to manage and enroll teams). Use that to enroll teams into your selected season.
Step 4 — Add locations (and courts)
Add locations
From the dashboard, click Add Locations (or go to Locations & Courts).
On the Locations page:
- Use Add Location
- Add Single Location
- Bulk Add from Clubs/Teams
Add courts
Courts control how many games can run in parallel at a venue.
On the Locations page header you can click:
- Add Court
That opens a 2-step flow and ends with Add Courts.
Optional but common: mark venue closures
When you edit a location, you can manage Closed / Unavailable time ranges (these are hard blackouts for that location). This is a common “season setup” task for gym availability.
Step 5 — Quick QA checklist (before you schedule)
Use this as your “green-light” checklist:
- Season with dates: you created the season and set Start Date * / End Date *
- At least 2 teams: at least two teams are enrolled in the season
- At least 1 location: you added a venue
- At least 1 court: at least one court exists (MatchGrid will prompt you to add courts if not)
When these are done, you’re ready to move on to creating a schedule.
Common setup gotchas
“Teams exist, but the checklist still says I need 2 teams”
That usually means teams exist in the registry, but fewer than 2 are enrolled in the selected season. Go to Teams → Registry and enroll them.
“Add Locations is complete, but I’m still blocked”
Locations and courts are separate. If you have venues but no courts, the checklist will still prompt Add Court.
Next: create the schedule
Once setup is complete, you can proceed to scheduling from the dashboard (for example, the tile Create Schedule).